Designing a Rubik’s Cube solution infographic
October 15, 2006
Every project is a unique puzzle waiting to be solved. And what better way to exemplify this than by delving into the intricacies of the iconic Rubik’s Cube? Here is an infographic I produced for the Sarasota Herald-Tribune sometime ago that details the complexities of solving the popular puzzle.

First Layer
Goal: Solve the first layer. Its top should be all white, and the other colors along its edge should match one another.
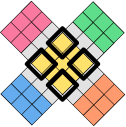
Step 1: Form a White Cross
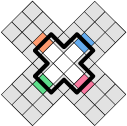
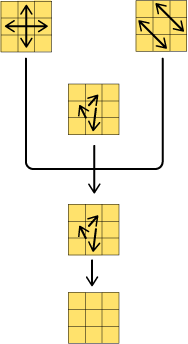
Position the cube so that the white centerpiece faces up. Move each of the four white edge pieces up into the first layer using the following algorithms. For an explanation of the letters in the algorithms, see the legend at the top of this webpage. An x on each illustration shows the final position of the piece after using an algorithm.

T'-R-T

T-T-R-T'-T'

T-R-T'

R

F'

T'-F'-T

T-T-F'-T'-T'

T-F'-T'
What if an edge piece is in the top or bottom layer?


Perform F or F' moves to bring the edge piece into the middle layer. Then use the appropriate algorithm listed above.
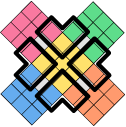
Step 2: Solve the Corners
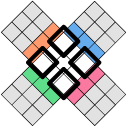
Flip the cube over so that the yellow centerpiece faces up. Then find a corner piece that has white and is in the top layer. Use T or T' moves to relocate it directly above its target position, then use one of the following algorithms to put the piece into place. Repeat this process for the remaining three corner pieces.

T-R-T'-R'

T'-F'-T-F

T'-F'-T-F
What if a corner piece is in the bottom layer but not oriented correctly?


Use this algorithm: R-T-R'-T'. It will bring the piece to the top layer. Then use one of the algorithms listed above to put the piece back down into the right spot.

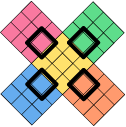
Middle Layer
Goal: Move four edge pieces into the middle layer, matching the colors on each piece with the centerpieces on the sides of the cube.
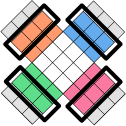
Look for edge pieces that do not have a yellow sticker on them. Position each piece, first using T or T' moves to put it on the desired side, and then using one of the following algorithms.
These slightly lengthier algorithms will preserve the positions of the pieces in the layer you already solved.

T-R-T'-R'-T'-F'-T-F

T'-L'-T-L-T-F-T'-F'
What if the edge piece you want to place is already in the middle layer but not oriented correctly?

Use one of the previous algorithms to temporarily switch the piece with another piece in the top layer. Then proceed to reposition it correctly.

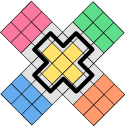
Final Layer
Goal: Solve the Rubik’s Cube by completing the last phase, which has four steps.
Step 1: Orient the Edge Pieces
Use the following six-move algorithm to get the yellow on all the edge pieces facing up.

R'-T'-F'-T-F-R
Step 2: Orient the Corner Pieces
Repeat the following eight-move algorithm until the yellow on all the corner pieces is facing up.
R-T-R'-T-R-T-T-R'-T-T
Step 3: Position the Corner Pieces
Use the following 13-move algorithm to swap the positions of two corner pieces. Repeat until all four corner pieces are in their correct places.

R'-F-R'-B-B-R-F'-R'-B-B-R-R-T'
Step 4: Position the Edge Pieces
Use the following 12-move algorithm to move the edge pieces into their final positions.
R-R-T-R-T-R'-T'-R'-T'-R'-T-R'
About the project
Research & sketching. After conducting research, sketching allowed me to explore different combinations and visualize potential solutions. I experimented with various layouts and graphic elements.
Vector graphics. After solidifying some concepts, I crafted scalable and visually precise vector graphics using Adobe Illustrator. Vector graphics allow for scalability and crisp visuals.
Layout design. Creating the final layout, I carefully considered several aspects, including the placement of each element in the infographic, the hierarchy of its information, and its flow.
On the web. In adding this project to my portfolio, I transformed the graphic from something static, designed for newspaper printing, to a responsive web asset. HTML, CSS, and SVG markup allow users to view the story on a variety of screen sizes.